

how to create table of contents in word 2016
Easily Create a Custom vs Manual Table of Contents (TOC) in a Microsoft Word Document
by Avantix Learning Team | Updated July 10, 2021
Applies to: Microsoft® Word® 2010, 2013, 2016, 2019 or 365 (Windows)
You can create a custom, as opposed to manual, table of contents in Microsoft Word using built-in heading styles and then easily update it when your document changes. Although you can insert a table of contents or TOC in other ways, it's simple to use Word's built-in styles (such as Heading 1, Heading 2 and so on). After you generate your table of contents from the heading styles, you can change the formatting and update it at any time.
Because a table of contents is a Word field, you should not type over it as any typing will be removed when you update the TOC.
In all versions of Microsoft Word, there are 4 steps for creating a table of contents using heading styles:
- Prepare the document by applying built-in heading styles such as Heading 1, Heading 2 and so on
- Create or generate the table of contents
- Format the table of contents
- Update the table of contents
A custom (vs manual) table of contents can be easier to maintain and format for most Word users. An automatic table of contents is inserted in a content control and some users may have difficulty working with, or understanding, content controls (which act as containers for specific content). The Manual Table that appears in the Insert Table of Contents drop-down menu is an option that requires the user to type entries and is not an efficient way to create a table of contents in Word (and should rarely be used).
Recommended article: 14 Timesaving Microsoft Word Shortcuts to Quickly Select Text
Do you want to learn more about Microsoft Word? Check out our virtual classroom or live classroom Word courses >
Step 1: Prepare the document by applying built-in heading styles
In order to easily insert a table of contents in Word, you'll need to apply heading styles to titles and subheadings in your document first.
To apply a built-in heading style to a title or subheading:
- Click in the title or subheading to which you wish to apply a built-in heading style. Each title or subheading is a paragraph and should be followed by a hard return (you pressed Enter or Return).
- Click the Home tab in the Ribbon and in the Styles group, click a heading style (such as Heading 1).
It's common to have one or two levels of headings (Heading 1 and Heading 2), but you can apply multiple heading levels.
You can also click in a title or subheading and press Ctrl + Alt + 1 for Heading 1, Ctrl + Alt + 2 for Heading 2 and so on.
Step 2: Create the table of contents (custom vs manual)
Once you have applied built-in heading styles, you can easily create a custom table of contents or TOC.
To create a custom (vs manual) table of contents that does not appear in a content control:
- Click in the document where you want to insert or create a table of contents (typically at the beginning of the document).
- Type "Contents" or "Table of Contents" and press Enter. Format the text, but do not use built-in heading styles.
- Click the References tab in the Ribbon and click Table of Contents in the Table of Contents group. A drop-down menu appears.
- Select Custom Table of Contents (2013 and later versions) or Insert Table of Contents (2010). A custom or manual table of contents will give you control over what's included and the formatting of the table of contents. A dialog box appears.
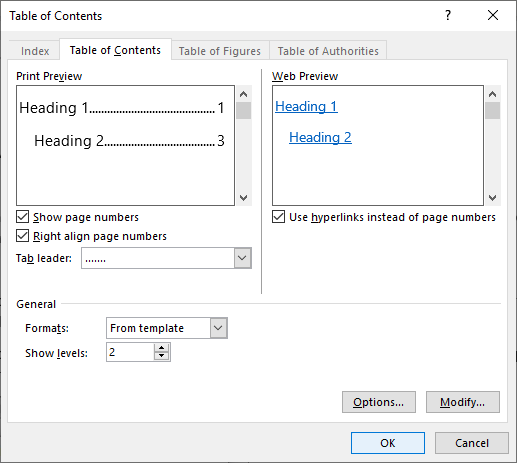
- Enter the number of levels to display in the table of contents beside Show levels (such as 2).
- Click OK. A table of contents appears in the document. This is a Word field so if you click in it, it will normally appear in grey. Do not type manual entries in the table of contents.
Below is the Table of Contents dialog box:
Step 3: Format the table of contents
You can format a custom or manual table of contents in many ways using the Table of Contents dialog box:
- Click in the table of contents.
- Click the References tab in the Ribbon and click Table of Contents in the Table of Contents group. A drop-down menu appears.
- Select Custom Table of Contents (2013 and later versions) or Insert Table of Contents (2010). A dialog box appears.
- If you'd like a different tab leader leading up to the numbers in the table of contents, select a leader from the Tab leader drop-down menu.
- Click Modify. Note: you will not be able to select Modify if you have selected any option other than From Template from the Formats drop-down menu. A dialog box appears.
- Click TOC 1 if you wish to format the first level in the table of contents and then click Modify. Select the desired options (such as font size, bold, etc.) and click OK.
- Repeat for other TOC levels.
- Continue clicking OK until you return to the document. A dialog box appears asking if you wish to replace the table of contents. Click OK.
Below is the Style dialog box that appears when you click Modify:
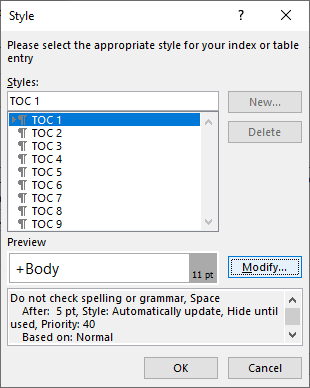
When you click a TOC style and then click Modify, the following dialog box appears:

You can select options under Formatting or click Format on the bottom left and select other options such as Font or Paragraph.
Step 4: Update the table of contents
After you edit your document, you can update the table of contents at any time.
To update a table of contents:
- Click in the table of contents.
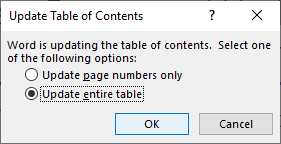
- Right-click and select Update Field from the drop-down menu or press F9. You can also click the References tab and then click Update Table in the Table of Contents group. A dialog box appears.
- Click Update page numbers only or Update entire table (recommended).
- Click OK.
Remove a table of contents
You can remove a table of contents if it's no longer required.
To remove a table of contents:
- Click in the table of contents.
- Click the References tab in the Ribbon and click Table of Contents in the Table of Contents group. A drop-down menu appears.
- Select Remove Table of Contents.
You can also select the entire table of contents by dragging over it and then pressing Delete.
Table of contents can be generated easily from built-in heading styles so it's best to use the built-in styles when formatting your Word documents rather than creating new styles for headings.
Subscribe to get more articles like this one
Did you find this article helpful? If you would like to receive new articles, join our email list.
More resources
How to Keep Text Together in Microsoft Word
How to Create, Edit, Use and Save Templates in Microsoft Word
10 Microsoft Word Navigation Shortcuts for Moving Around Faster
How to Insert an Em or En Dash in Word (4 Ways with Shortcuts)
How to Convert a PDF to Word Inside Microsoft Office (No Third Party Programs Needed)
Related courses
Microsoft Word: Intermediate / Advanced
Microsoft Word: Designing Dynamic Word Documents Using Fields
Microsoft Word: Long Documents Master Class
Microsoft Excel: Intermediate / Advanced
Microsoft PowerPoint: Intermediate / Advanced
VIEW MORE COURSES >
Our instructor-led courses are delivered in virtual classroom format or at our downtown Toronto location at 1 Yonge Street, Suite 1801 (Toronto Star Building), Toronto, Ontario, Canada (some in-person classroom courses may also be delivered at an alternate downtown Toronto location). Contact us at info@avantixlearning.ca if you'd like to arrange custom onsite training or an online course on a date that's convenient for you.
Copyright 2021 Avantix ® Learning
Microsoft, the Microsoft logo, Microsoft Office and related Microsoft applications and logos are registered trademarks of Microsoft Corporation in Canada, US and other countries. All other trademarks are the property of the registered owners.
Avantix Learning | 1 Yonge Street, Suite 1801 (Toronto Star Building), Toronto, Ontario, Canada M5E 1W7 | info@avantixlearning.ca
how to create table of contents in word 2016
Source: https://www.avantixlearning.ca/microsoft-word/how-to-insert-format-and-update-a-table-of-contents-in-microsoft-word/
Posted by: wardacte1943.blogspot.com
0 Response to "how to create table of contents in word 2016"
Post a Comment