

How To Create Ldom In Solaris 11
SUN LDOMS aka Oracle VM for SPARC is a complete virtual machine that runs an independent operating system and contains its own virtual CPU's, Storage, Memory, Cryptographic and console. Unlike Solaris zones, LDOMS can run its own operating system with different kernel patch levels. You can also install Solaris 8, Solaris 9, Solaris 10 and Solaris 11 on LDOMS. LDOM also provides the OBP for each logical domains but we won't get that in zones. LDOM also allow moving the resources across the logical domains or virtual hosts exclusively. LDOM also allows you to configure zones under that.
Tutorials Topics:
- Installation and Configuring the Primary domain (You are here)
- Creating Guest Domains
- Configuring I/O Domain
- Dynamically adding/removing Resources
- Live Migration for Guest Domains
- Adding ISO image to Multiple Guests
- Configuration Backup & Restore
- Removing the LDOM and Services
- LDOM Quick Reference
Prerequisite:
- Oracle/Sun T-series Server (T5140 Firmware:7.3.3 )
- Solaris 10 or Solaris 11 (To be directly installed on T-series server)
- LDOM Packages (Ex: 2.1)
- Server Hardware Console Access
Contents:
- Basic Concepts of LDOM
- Installation of LDOM Software
- Configuring the Service Domains
- Configuring the Control Domains
- Saving the SP-Profile
Basic Concepts of LDOM or Oracle VM for SPARC:
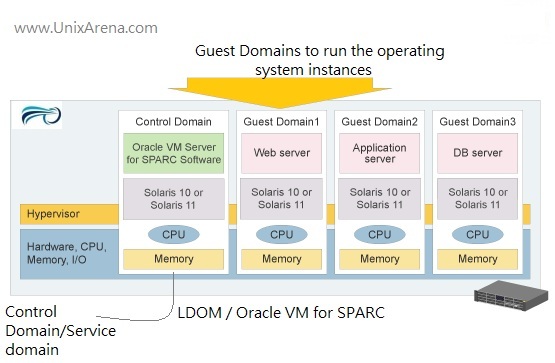
LDOM is a hardware based virtualization which works on top the hypervisor. To understand better, you should know the type of terms used in LDOM or oracle VM for SPARC.
- Control Domain is the place where you are going to install the LDOM software and managing the complete logical domain environment.It used to configure the resources and guest domains
- Service domain provides the various virtual services to guest domains. Virtaul services can be virtual disks,network switches or virtual consoles. Mostly we will be configuring the control domain as service domain too.
I/O Domains have a direct ownership of PCI Bus. You need to directly map the I/O devices to the guest domain to improve the application performance in some cases. There is another domain called "root domain" and this domain has direct ownership of PCI devices. So it also called I/O domain.
- Guest domains don't perform any of the above-mentioned roles. It jsut runs the operating system instances.
- Control domain and service domain can be run together. But the user application should not be installed on this domain in a order to protect domain stability and performance.
Installation of LDOM software:
Download the LDOM packages from the oracle support website. For your information ,you can't download without having the oracle support login credentials. Once you have downloaded the packages ,just copy the packages to the Solaris host which you have already installed on T- series server.
1. The below mentioned packages needs to be installed .
-rwxr-xr-x 1 root root 3564851 Jan 16 23:26 OracleVM-Server-for-SPARC-2.0.0_(64-bit).zip drwxrwxrwx 5 root root 512 Jan 16 23:26 SUNWldomr.v drwxrwxrwx 5 root root 512 Jan 16 23:26 SUNWldomu.v
2. Install the SUNWldomr and SUNWldomu packages first.
-bash-3.2# pkgadd -d . SUNWldom* Processing package instance from </> Solaris Logical Domains (Root)(sparc.sun4v) 11.10.0,REV=2006.10.04.00.26 Copyright (c) 2011, Oracle and/or its affiliates. All rights reserved. This appears to be an attempt to install the same architecture and version of a package which is already installed. This installation will attempt to overwrite this package. Using </> as the package base directory. ## Processing package information. ## Processing system information. 42 package pathnames are already properly installed. ## Verifying package dependencies. ## Verifying disk space requirements. ## Checking for conflicts with packages already installed. ## Checking for setuid/setgid programs. This package contains scripts which will be executed with super-user permission during the process of installing this package. Do you want to continue with the installation of [y,n,?] y Installing Solaris Logical Domains (Root) as ## Executing preinstall script. ## Installing part 1 of 1. [ verifying class ] ## Executing postinstall script. Installation of was successful. Processing package instance from </> Solaris Logical Domains (Usr)(sparc.sun4v) 11.10.0,REV=2006.08.08.12.13 Copyright (c) 2011, Oracle and/or its affiliates. All rights reserved. This appears to be an attempt to install the same architecture and version of a package which is already installed. This installation will attempt to overwrite this package. Using </> as the package base directory. ## Processing package information. ## Processing system information. 11 package pathnames are already properly installed. ## Verifying package dependencies. ## Verifying disk space requirements. ## Checking for conflicts with packages already installed. ## Checking for setuid/setgid programs. This package contains scripts which will be executed with super-user permission during the process of installing this package. Do you want to continue with the installation of [y,n,?] y Installing Solaris Logical Domains (Usr) as ## Installing part 1 of 1. Installation of was successful. -bash-3.2#
3. Install the LDOM software . Unzip the package and continue the installation like below
-bash-3.2# cd OVM_Server_SPARC-2_0 -bash-3.2# ls -lrt total 12 -r--r--r-- 1 root root 3368 Sep 17 2010 README drwxr-xr-x 2 root root 512 Sep 18 2010 Install drwxr-xr-x 7 root root 512 Dec 16 2010 Product -bash-3.2# cd Install/ -bash-3.2# ls -lrt total 56 -rwxr-xr-x 1 root root 28471 Sep 18 2010 install-ldm -bash-3.2# ./install-ldm Welcome to the Oracle VM Server for SPARC installer. You are about to install the LDoms Manager package, SUNWldm, that will enable you to create, destroy and control other domains on your system. You will also be given the option of running the Oracle VM Server for SPARC Configuration Assistant (ldmconfig) to setup the control domain and create guest domains. If the Solaris Security Toolkit (SST) is installed, you will be prompted to optionally harden your control domain. Installing LDoms packages. pkgadd -n -d "/OVM_Server_SPARC-2_0/Product" -a pkg_admin SUNWldm.v Copyright (c) 2010, Oracle and/or its affiliates. All rights reserved. Feb 17 10:37:54 sol10-10 sendmail[2631]: [ID 702911 mail.alert] unable to qualify my own domain name (sol10-10) -- using short name Installation of was successful. pkgadd -n -d "/OVM_Server_SPARC-2_0/Product" -a pkg_admin SUNWldmp2v Copyright (c) 2010, Oracle and/or its affiliates. All rights reserved. Feb 17 10:38:54 sol10-10 sendmail[2705]: [ID 702911 mail.alert] unable to qualify my own domain name (sol10-10) -- using short name Installation of was successful. Oracle VM Server for SPARC Configuration Once installed, you may configure your system for a basic LDoms deployment. If you select "y" for the following question, the Oracle VM Server for SPARC Configuration Assistant (tty) will be launched following a successful installation of the packages. (You may launch the Configuration Assistant at a later time with the command: /usr/sbin/ldmconfig, or use the GUI Configuration Assistant which is bundled in the Oracle VM Server for SPARC zip file - see README.GUI for more details) Select an option for configuration: y) Yes, launch the Configuration Assistant after install n) No thanks, I will configure the system manually later Enter y or n [y]: n Verifying that all packages are fully installed. OK. You have new mail in /var/mail//root -bash-3.2#
Configuring the Service Domains:
Login to the Solaris host where you have installed the LDOM or oracle VM software.
1. List the configured services. By default it will be nothing.
-bash-3.2# ldm list-services
2. Create a new virtual disk service. This service is responsible to provide the virtual disks to guest domains.
-bash-3.2# ldm add-vdiskserver primary-vds0 primary -bash-3.2# ldm list-services VDS NAME LDOM VOLUME OPTIONS MPGROUP DEVICE primary-vds0 primary -bash-3.2#
3. Create a new virtual switch. By creating this , we can create N-number of VNIC and share to the guest domains.
-bash-3.2# dladm show-dev nxge0 link: up speed: 1000 Mbps duplex: full nxge1 link: up speed: 1000 Mbps duplex: full nxge2 link: up speed: 1000 Mbps duplex: full nxge3 link: up speed: 1000 Mbps duplex: full -bash-3.2# ifconfig -a lo0: flags=2001000849<UP,LOOPBACK,RUNNING,MULTICAST,IPv4,VIRTUAL> mtu 8232 index 1 inet 127.0.0.1 netmask ff000000 nxge0: flags=1000843<UP,BROADCAST,RUNNING,MULTICAST,IPv4> mtu 1500 index 2 inet 192.168.2.11 netmask ff000000 broadcast 192.168.2.255 ether 0:21:98:57:cd:16 -bash-3.2# ldm add-vswitch net-dev=nxge1 primary-vsw0 primary -bash-3.2# -bash-3.2# ldm list-services VSW NAME LDOM MAC NET-DEV ID DEVICE LINKPROP DEFAULT-VLAN-ID PVID VID MTU MODE primary-vsw0 primary 00:14:4f:f9:05:b1 nxge1 0 switch@0 1 1 1500 VDS NAME LDOM VOLUME OPTIONS MPGROUP DEVICE primary-vds0 primary -bash-3.2#
Here I have configured virtual switch using "nxge1". You can also use "nxge0" configure the virtual swtich but you need to remove the IP from nxge0 and need to configure the IP over the virtual switch.
-bash-3.2# ifconfig -a lo0: flags=2001000849<UP,LOOPBACK,RUNNING,MULTICAST,IPv4,VIRTUAL> mtu 8232 index 1 inet 127.0.0.1 netmask ff000000 vsw0: flags=1000843<UP,BROADCAST,RUNNING,MULTICAST,IPv4> mtu 1500 index 3 inet 198.168.2.11 netmask ff000000 broadcast 192.168.2.255 ether 0:14:4f:98:83:f3 -bash-3.2#
4. Create a virtual service for terminal consoles.
-bash-3.2# ldm add-vconscon port-range=5000-5100 primary-vc0 primary -bash-3.2# ldm list-services VCC NAME LDOM PORT-RANGE primary-vc0 primary 5000-5100 VDS NAME LDOM VOLUME OPTIONS MPGROUP DEVICE primary-vds0 primary -bash-3.2# VSW NAME LDOM MAC NET-DEV ID DEVICE LINKPROP DEFAULT-VLAN-ID PVID VID MTU MODE primary-vsw0 primary 00:14:4f:f9:05:b1 nxge1 0 switch@0 1 1 1500
Now you have successfully configured the default services or service domain.
(Creating the spconfig is must after making any changes on the service.Otherwise you will loose the changes after the system power cycle.)
Configuring the control Domains:
You need to login to Solaris host where you have installed the ldom software to configure the control domain.
1.List the logical domain devices using ldm list-device -a command.You can see all the resource has been allocated to the primary domain.
bash-3.2# ldm list-devices -a CORE ID %FREE CPUSET 0 0 (0, 1, 2, 3, 4, 5, 6, 7) 1 0 (8, 9, 10, 11, 12, 13, 14, 15) 2 0 (16, 17, 18, 19, 20, 21, 22, 23) 3 0 (24, 25, 26, 27, 28, 29, 30, 31) 4 0 (64, 65, 66, 67, 68, 69, 70, 71) 5 0 (72, 73, 74, 75, 76, 77, 78, 79) 6 0 (80, 81, 82, 83, 84, 85, 86, 87) 7 0 (88, 89, 90, 91, 92, 93, 94, 95) VCPU PID %FREE PM 0 0 no 1 0 no 2 0 no 3 0 no 4 0 no 5 0 no 6 0 no 7 0 no 8 0 no 9 0 no 10 0 no 11 0 no 12 0 no 13 0 no 14 0 no 15 0 no 16 0 no 17 0 no 18 0 no 19 0 no 20 0 no 21 0 no 22 0 no 23 0 no 24 0 no 25 0 no 26 0 no 27 0 no 28 0 no 29 0 no 30 0 no 31 0 no 64 0 no 65 0 no 66 0 no 67 0 no 68 0 no 69 0 no 70 0 no 71 0 no 72 0 no 73 0 no 74 0 no 75 0 no 76 0 no 77 0 no 78 0 no 79 0 no 80 0 no 81 0 no 82 0 no 83 0 no 84 0 no 85 0 no 86 0 no 87 0 no 88 0 no 89 0 no 90 0 no 91 0 no 92 0 no 93 0 no 94 0 no 95 0 no MAU ID CPUSET BOUND 0 (0, 1, 2, 3, 4, 5, 6, 7) primary 1 (8, 9, 10, 11, 12, 13, 14, 15) primary 2 (16, 17, 18, 19, 20, 21, 22, 23) primary 3 (24, 25, 26, 27, 28, 29, 30, 31) primary 4 (64, 65, 66, 67, 68, 69, 70, 71) primary 5 (72, 73, 74, 75, 76, 77, 78, 79) primary 6 (80, 81, 82, 83, 84, 85, 86, 87) primary 7 (88, 89, 90, 91, 92, 93, 94, 95) primary MEMORY PA SIZE BOUND 0x0 512K _sys_ 0x80000 1536K _sys_ 0x200000 94M _sys_ 0x6000000 32M _sys_ 0x8000000 96M _sys_ 0xe000000 32544M primary IO DEVICE PSEUDONYM BOUND OPTIONS pci@400 pci_0 yes pci@500 pci_1 yes bash-3.2#
2.List what are the resources assigned to the primary domain or control domains.
bash-3.2# ldm list-bindings primary NAME STATE FLAGS CONS VCPU MEMORY UTIL UPTIME primary active -n-c-- SP 64 32544M 0.1% 9m UUID f063b0a8-8fb0-4e61-cd5b-91826d2c1550 MAC 00:21:28:57:cd:16 HOSTID 0x8557cd16 CONTROL failure-policy=ignore DEPENDENCY master= CORE CID CPUSET 0 (0, 1, 2, 3, 4, 5, 6, 7) 1 (8, 9, 10, 11, 12, 13, 14, 15) 2 (16, 17, 18, 19, 20, 21, 22, 23) 3 (24, 25, 26, 27, 28, 29, 30, 31) 4 (64, 65, 66, 67, 68, 69, 70, 71) 5 (72, 73, 74, 75, 76, 77, 78, 79) 6 (80, 81, 82, 83, 84, 85, 86, 87) 7 (88, 89, 90, 91, 92, 93, 94, 95) VCPU VID PID CID UTIL STRAND 0 0 0 1.5% 100% 1 1 0 0.0% 100% 2 2 0 0.0% 100% 3 3 0 0.0% 100% 4 4 0 0.0% 100% 5 5 0 0.0% 100% 6 6 0 0.0% 100% 7 7 0 0.0% 100% 8 8 1 0.0% 100% 9 9 1 0.1% 100% 10 10 1 0.0% 100% 11 11 1 0.1% 100% 12 12 1 0.1% 100% 13 13 1 3.0% 100% 14 14 1 0.0% 100% 15 15 1 0.1% 100% 16 16 2 0.1% 100% 17 17 2 0.2% 100% 18 18 2 0.1% 100% 19 19 2 0.0% 100% 20 20 2 0.1% 100% 21 21 2 0.0% 100% 22 22 2 0.1% 100% 23 23 2 0.0% 100% 24 24 3 0.0% 100% 25 25 3 0.0% 100% 26 26 3 0.0% 100% 27 27 3 0.0% 100% 28 28 3 0.2% 100% 29 29 3 0.1% 100% 30 30 3 0.1% 100% 31 31 3 0.0% 100% 64 64 4 0.0% 100% 65 65 4 0.0% 100% 66 66 4 0.0% 100% 67 67 4 0.0% 100% 68 68 4 0.0% 100% 69 69 4 0.0% 100% 70 70 4 0.0% 100% 71 71 4 0.0% 100% 72 72 5 0.0% 100% 73 73 5 0.0% 100% 74 74 5 0.0% 100% 75 75 5 0.0% 100% 76 76 5 0.0% 100% 77 77 5 0.0% 100% 78 78 5 0.0% 100% 79 79 5 0.0% 100% 80 80 6 0.0% 100% 81 81 6 0.0% 100% 82 82 6 0.0% 100% 83 83 6 0.0% 100% 84 84 6 0.0% 100% 85 85 6 0.0% 100% 86 86 6 0.0% 100% 87 87 6 0.0% 100% 88 88 7 0.0% 100% 89 89 7 0.0% 100% 90 90 7 0.0% 100% 91 91 7 0.0% 100% 92 92 7 0.0% 100% 93 93 7 0.0% 100% 94 94 7 0.0% 100% 95 95 7 0.0% 100% MAU ID CPUSET 0 (0, 1, 2, 3, 4, 5, 6, 7) 1 (8, 9, 10, 11, 12, 13, 14, 15) 2 (16, 17, 18, 19, 20, 21, 22, 23) 3 (24, 25, 26, 27, 28, 29, 30, 31) 4 (64, 65, 66, 67, 68, 69, 70, 71) 5 (72, 73, 74, 75, 76, 77, 78, 79) 6 (80, 81, 82, 83, 84, 85, 86, 87) 7 (88, 89, 90, 91, 92, 93, 94, 95) MEMORY RA PA SIZE 0xe000000 0xe000000 32544M IO DEVICE PSEUDONYM OPTIONS pci@400 pci_0 pci@500 pci_1 VCONS NAME SERVICE PORT SP bash-3.2#
3.Set the resource control for the control domain aka primary domain.So the resource will be freed up for the logical domains / Guest domains.
bash-3.2# ldm set-mau 1 primary bash-3.2# ldm set-vcpu 8 primary bash-3.2# ldm set-memory 4G primary A ldm set-mem 4G command would remove 28448MB, which is not a multiple of 256MB. Instead, run ldm set-mem 4128M primary to ensure a 256MB alignment. bash-3.2# ldm set-memory 3872M primary
- mau – Security Encryption (LDM commands will be sent in encrypted manner.)
- vpcu – Virtual CPU cores
- memory – Physical memory
4.Now list the devices again to verify the new settings.
bash-3.2# ldm ls-devices -a CORE ID %FREE CPUSET 0 0 (0, 1, 2, 3, 4, 5, 6, 7) 1 100 (8, 9, 10, 11, 12, 13, 14, 15) ----------->(1-7) Free CPU cores 2 100 (16, 17, 18, 19, 20, 21, 22, 23) 3 100 (24, 25, 26, 27, 28, 29, 30, 31) 4 100 (64, 65, 66, 67, 68, 69, 70, 71) 5 100 (72, 73, 74, 75, 76, 77, 78, 79) 6 100 (80, 81, 82, 83, 84, 85, 86, 87) 7 100 (88, 89, 90, 91, 92, 93, 94, 95) VCPU PID %FREE PM 0 0 no ----------These (0-7) CPU is not available since its assigned to primary domain 1 0 no 2 0 no 3 0 no 4 0 no 5 0 no 6 0 no 7 0 no 8 100 --- 9 100 --- 10 100 --- 11 100 --- 12 100 --- 13 100 --- 14 100 --- 15 100 --- 16 100 --- 17 100 --- 18 100 --- 19 100 --- 20 100 --- 21 100 --- 22 100 --- 23 100 --- 24 100 --- 25 100 --- 26 100 --- 27 100 --- 28 100 --- 29 100 --- 30 100 --- 31 100 --- 64 100 --- 65 100 --- 66 100 --- 67 100 --- 68 100 --- 69 100 --- 70 100 --- 71 100 --- 72 100 --- 73 100 --- 74 100 --- 75 100 --- 76 100 --- 77 100 --- 78 100 --- 79 100 --- 80 100 --- 81 100 --- 82 100 --- 83 100 --- 84 100 --- 85 100 --- 86 100 --- 87 100 --- 88 100 --- 89 100 --- 90 100 --- 91 100 --- 92 100 --- 93 100 --- 94 100 --- 95 100 --- MAU ID CPUSET BOUND 0 (0, 1, 2, 3, 4, 5, 6, 7) primary 1 (8, 9, 10, 11, 12, 13, 14, 15) 2 (16, 17, 18, 19, 20, 21, 22, 23) 3 (24, 25, 26, 27, 28, 29, 30, 31) 4 (64, 65, 66, 67, 68, 69, 70, 71) 5 (72, 73, 74, 75, 76, 77, 78, 79) 6 (80, 81, 82, 83, 84, 85, 86, 87) 7 (88, 89, 90, 91, 92, 93, 94, 95) MEMORY PA SIZE BOUND 0x0 512K _sys_ 0x80000 1536K _sys_ 0x200000 94M _sys_ 0x6000000 32M _sys_ 0x8000000 96M _sys_ 0xe000000 32M primary 0x10000000 28G -----------------------------Free Memory 0x710000000 3840M primary -----------Allocated to Primary or control Domain IO DEVICE PSEUDONYM BOUND OPTIONS pci@400 pci_0 yes pci@500 pci_1 yes bash-3.2#
You have successfully configured the control domain.
Note: Here you haven't saved the configuration. These are all in-memory configuration. After the power cycle, you will lose the configuration if it's not saved in sp config profile.
Saving the sp-config file:
You have to save the configuration after every ldom settings that you made. For an example, if you didn't save, ldom configuration will be flushed after server power cycle.
1. Create a new profile in the current configuration.
bash-3.2# ldm add-spconfig unixarena bash-3.2# ldm ls-spconfig factory-default unixarena [current] bash-3.2#
In the above command output, you can see that currents settings are saved in unixarena and these settings will come up after the system reboot and power cycle.
For an example, if I do any small changes on ldom, it will not update in the spconfig file.
bash-3.2# ldm set-vcpu 12 primary bash-3.2# ldm ls-spconfig factory-default unixarena [next poweron] bash-3.2#
Here we just increased the number vpcus to 12 . The previous number of vpcu was 8. Here sp-config file "unixarena" will be activated on next power cycle. Which mean you will lose the CPU setting you just done. In an order to save the configuration, just re-create the sp-config like below.
bash-3.2# ldm ls-spconfig factory-default unixarena [next poweron] bash-3.2# ldm remove-spconfig unixarena bash-3.2# ldm ls-spconfig factory-default [next poweron] bash-3.2# ldm add-spconfig unixarena_new bash-3.2# ldm ls-spconfig factory-default unixarena_new [current] bash-3.2#
Checking the OBP,Hypervisor and LDOM version:
-bash-3.2# ldm -V Logical Domain Manager (v 2.0) Hypervisor control protocol v 1.4 Using Hypervisor MD v 1.1 System PROM: Hypervisor v. 1.7.4. @(#)Hypervisor 1.7.4.a 2009/09/21 08:25\015 OpenBoot v. 4.30.4 @(#)OBP 4.30.4 2009/08/19 07:25 -bash-3.2#
Hope this article first steps to learn LDOM for Solari's beginners. In this article we have seen the basic concepts of Oracle VM for SPARC (LDOM), packages installation, the configuration of the service domain, configuring the control domain or primary domain and saving the sp-configuration.
I will try to complete thetutorial by adding another 6 to 8articles. Hope you will like it. Please share it in social media to reach the maximum number of people. Thank you for visiting UnixArena
LDOM Tutorial Part 2 – Configuring the guest domain
How To Create Ldom In Solaris 11
Source: https://www.unixarena.com/2014/02/ldom-oracle-vm-sparc-tutorial-1.html/
Posted by: wardacte1943.blogspot.com
0 Response to "How To Create Ldom In Solaris 11"
Post a Comment